Saturday, 14 May 2011

How To Add Perfect Share Box to Blogger

Posted by NEWS on 22:12 0 comments

This share box contains official Tweet button with counter, official Facebook share button with counter, official Google Buzz button with counter, official Stumbleupon button with counter, BlogThis! link, Email This! link, Print This! link, Comments count link and Facebook like button. I have configure all this button for Blogger blogs, so you can add this share box quickly to your blog.

 Perfect Share Box for Bloggers 

Now follow the steps given below to add this share box for your blog.

1.Login to your blogger Dashboard and go to --> Design- -> Edit HTML

2.Click on "Expand Widget Templates"

3.Scroll down to where you see below code:
<div class='post-header-line-1'/>

4.Now Copy Share Box code given below and paste it just below the above code.

NOTE: If you can't find <div class='post-header-line-1'/> in your template, paste your "Twitter tweet button" code just before <data:post.body/> .

<b:if cond='data:blog.pageType == &quot;item&quot;'>

<style type='text/css'>
.multisharebox {
  background: none repeat scroll 0 0 #EFEFEF;
  float: right;
  margin: 5px 0px 3px 10px;
  padding: 0 5px 0;
  text-shadow: 0 1px 0 #FFFFFF;
  width: 260px;
  border:4px solid #d8dfea;
}
.fb-like-boxtop {
  background: none repeat scroll 0 0 #EDEFF4;
  border: 1px solid #D8DFEA;
  color: #000000;
  float: right;
  font-size: 11px;
  margin: 0 0;
  padding: 5px 10px;
  text-align: left;
  width: 230px;
}
.fb-like-boxtop a {
  color: #000000;
  text-decoration:none;
}
.fb-like-boxtop a:hover {
  color: #000000;
  text-decoration:underline;
}
.fb-like-box {
  background: none repeat scroll 0 0 #EDEFF4;
  border: 1px solid #D8DFEA;
  color: #000000;
  float: right;
  font-size: 11px;
  height: 60px;
  margin: 5px 0;
  overflow: hidden;
  padding: 5px 10px;
  text-align: left;
  width: 230px;
}
</style>

<!-- Perfect Share Box : Created by www.bloggertipandtrick.net  -->
<div class='multisharebox'>
<table><tr>
<td><table><tr>
<td><a class='twitter-share-button' data-count='vertical' data-lang='en' data-related='' data-via='' expr:data-text='data:post.title' expr:data-url='data:post.url' href='http://twitter.com/share' rel='nofollow'/>
<b:if cond='data:post.isFirstPost'>
<script src='http://platform.twitter.com/widgets.js' type='text/javascript'>
</script>
</b:if></td>
<td><script expr:src='&quot;http://www.stumbleupon.com/hostedbadge.php?s=5&amp;r=&quot; + data:post.url'/></td>
<td><a class='google-buzz-button' data-button-style='normal-count' data-locale='en_IN' expr:data-url='data:post.url' href='http://www.google.com/buzz/post' rel='nofollow' title='Post on Google Buzz'/>
<script src='http://www.google.com/buzz/api/button.js' type='text/javascript'/></td>
<td><a expr:share_url='data:post.url' name='fb_share' rel='nofollow' type='box_count'/>
<script src='http://static.ak.fbcdn.net/connect.php/js/FB.Share' type='text/javascript'/></td>
</tr></table></td>
</tr><tr>
<td><div class='fb-like-boxtop'><a expr:href='data:post.sharePostUrl + &quot;&amp;target=blog&quot;' expr:onclick='&quot;window.open(this.href, \&quot;_blank\&quot;, \&quot;height=270,width=475\&quot;); return false;&quot;' expr:title='data:top.blogThisMsg' target='_blank'>BlogThis!</a> | <a expr:href='data:post.sharePostUrl + &quot;&amp;target=email&quot;' expr:title='data:top.emailThisMsg' target='_blank'>Email This!</a> | <a href='javascript:window.print();'>Print This!</a> | <b:if cond='data:post.allowComments'><a expr:href='data:post.addCommentUrl' expr:onclick='data:post.addCommentOnclick'><b:if cond='data:post.numComments == 0'>No comments</b:if><b:if cond='data:post.numComments == 1'>1 comment</b:if><b:if cond='data:post.numComments &gt;= 2'><data:post.numComments/> comments</b:if></a></b:if></div></td>
</tr><tr>
<td><div class='fb-like-box'>
Do you like this post?
<iframe allowTransparency='true' expr:src='&quot;http://www.facebook.com/plugins/like.php?href=&quot; + data:post.url + &quot;&amp;layout=standard&amp;show_faces=false&amp;width=230&amp;action=like&amp;font=arial&amp;colorscheme=light&quot;' frameborder='0' scrolling='no' style='border:none; overflow:hidden; width:230px; height:40px;'/>
</div></td>
</tr></table>
</div>
<!-- Perfect Share Box : Created by www.bloggertipandtrick.net  -->

</b:if>

Note : This share box now will add to your Blogger post pages only. If you want to show it in every pages, then simply remove green lines from the code.

5. Save your template and you are done.
Continue...


Sunday, 17 April 2011

Official "Follow by Email" Feedburner Widget for Blogger

Posted by NEWS on 16:28 0 comments

Now Blogger has introduced "Follow by Email" Feedburner email subscription widget for blogger blogs. So you don't want to add your site to the Feedburner manually. It will save your time.

To add this widget to your blog,

1.Log in to your dashboard --> Design -->Page Elements.

2.Click on 'Add a Gadget' on the sidebar.

3.Select "Follow by Email".


Continue...


How do I create a blog that Blogger will host for free?

Posted by NEWS on 16:14 0 comments

Before you can create a free blog on Blog*Spot.

First Step : - Go On www.blogger.com and Create an account on blogger.com


Step 2 : - For Create An account click on Get Started and fill all details.


Step 3 : - Once you've logged into blogger.com, click the Create a Blog link above your list of blogs.


Screenshot: Create a Blog

Step 4 : - Enter a Title and Address (URL). You'll also need to type in the verification word displayed on this page, to confirm that you are a real person and not a computer. When you're done, click continue:

 Screenshot: Create Blog*Spot blog

Step 5 : - You can Choose a Template for your blog; this is how it will appear when you publish it. Next, Blogger will create your new blog and reserve your spot on BlogSpot.

As soon as you make your first post, your page will appear at the address you chose. You're all ready to blog!


Continue...


Blogger New Feature : Five New Dynamic Views

Posted by NEWS on 15:44 0 comments

Blogger currently offers five dynamic views for its public blogs. These views are only accessible if allowed for by the blog author.

You can also can see a message in your blogger dashboard. Use this new feature you must configure your sire feed as "Full". Unless it will not work.

Blogger Five new dynamic views

To enable this new 5 dynamic view feature for your blogger go to Settings --> Site Feed. Now from "Allow Blog Feeds" section, select the option "Full" and click on save. Now you blogger blog ready for this "Five New Dynamic Views" feature.

Blogger Feed Settings 

To view this dynamic views simply follow the url formats given below:
Flipcard : available at [yourblogURL]/view/flipcard
Mosaic : available at [yourblogURL]/view/mosaic
Sidebar : available at [yourblogURL]/view/sidebar
Snapshot : available at [yourblogURL]/view/snapshot
Timeslide : available at [yourblogURL]/view/timeslide 
 Replace [yourblogURL] with your blogger blog url.

 For Example : - 

Flipcard : http://blogger-tutorials-tricks.blogspot.com/view/flipcard
Mosaic : http://blogger-tutorials-tricks.blogspot.com/view/mosaic
Sidebar : http://blogger-tutorials-tricks.blogspot.com/view/sidebar
Snapshot : http://blogger-tutorials-tricks.blogspot.com/view/snapshot
Timeslide : http://blogger-tutorials-tricks.blogspot.com/view/timeslide

These views require modern browsers such as Internet Explorer 8+, Firefox 3.5+, Chrome or Safari. Many elements of these views will not work should you have an older browser.

In all views, search is available in the upper right hand corner. Clicking on the ">" arrow in the very top left of the header bar will slide the header bar across and allow you to choose different views for the current blog as well as type in a new blog URL.

There is also a feedback link for each view.
 

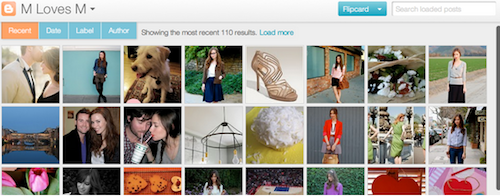
Flipcard

flipcard
  • Mouse over any of the cards to see the post title and comment count. As you scroll down, additional posts will continue to load.
  • Click on a card to see the post in full view. You can navigate through the posts using J (older post) and Kescape or click Back to all posts to return to the Flipcard view.
  • (newer post) or the arrow keys. Hit In the upper left, click to sort by Date, Author and Category.

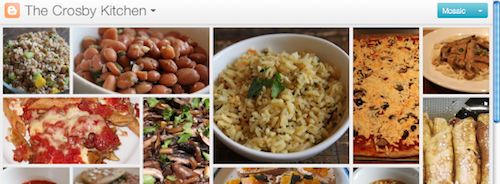
    Mosaic

    mosaic
    • Clicking on an individual tile will expand that post to the full width of the view, and clicking again will collapse the post back into its original position.
    • The exact position of the tiles is randomly determined each time the blog loads, but they will appear chronologically from top left to bottom right.
    • Once a tile is expanded, you can page down by using the "up" and "down" arrow keys as well as J and K. This view is optimized for the tablet viewing, and supports screen rotation.

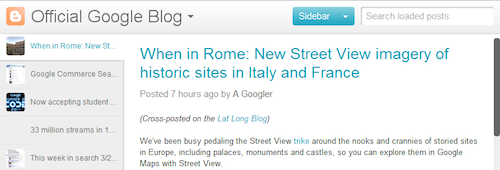
      Sidebar

      sidebar
      • Optimized for quick reading and browsing.
      • Left sidebar is list of chronological posts, with comment counts and thumbnails for individual posts.
      • J and K arrow keys will navigate through the posts, and comments can be displayed on the same page by clicking the Show link.

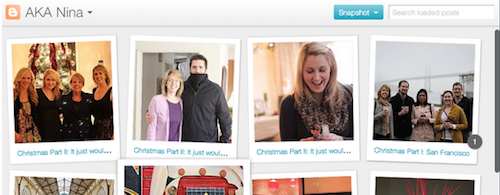
        Snapshot

        snapshot
        • This view will display only the posts which have images.
        • Clicking through any photo will display the full post page, with naviagtion links at the bottom for Newer and Older posts.
        • Mousing over any photo will display a post snippet.

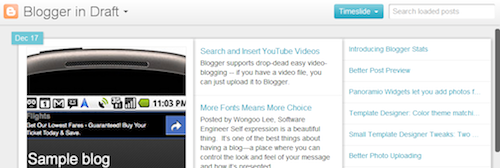
          Timeslide

          timeslide
          • This view breaks the blog content down into three different areas:
          • Left column: Enlarged picture with a post snippet, title, and snipppet displayed in chronological order
          • Middle column: Displays just the post title and snippet
          • Right column: Displays just the individual post titles
            • When searching for posts in this view, the results will be highlighted.

              Continue...